Hot Dog Relish, a recipe by Norma Gibbs

Cheers to those extraordinary moments, those breathtakingly beautiful landscapes, those unexpected connections.  The ones in which my spirit awakens, in which I feel most alive and for which I am filled with a deep sense of appreciation.

It is to a place seen only by those fortunate few that I dedicate this piece.

I never expected to find myself at a lake in the middle of Michigan.  I never expected to fall in love with this place either, let alone visit here at all.  But I did, three times over.

The lake is called Higgins, and it’s where the Gillespie family has called their summertime home for over three generations.

With each visit I am shown again of the unwavering generosity and warmest of welcomes.

To visit Lake Higgins is to take a step back in time, to a slower pace unconcerned with life’s most consuming trivialities.  Anyone is invited, everyone pitches in, and nobody’s counting.  Out there, it’s about the simplest forms of enjoyment, and enjoyment there is to be had.  It’s a gift alone to be a part of it.

The Gillespies have a neighbor and friend who also spends her summers at the lake.  Her name is Foxy, and her effervescent demeanor is a welcomed wake in the tranquil morning waters of Higgins. She’s just a joy to know.

When she heard of my passion for slow foods, canning, and farming, her excitement grew impossibly greater.  She grew up on a farm, she told me, and she’s been eating food from jars since before refrigerators were a household staple.  She even offered me a taste of her latest batch of homemade hot dog relish for me to taste and a recipe to bring home. It was her Grandma Norma’s recipe from when she was just a child, and it was simply delicious.

I followed the recipe once I returned home to Portland.

In cooking recipes both traditional and unique, there is something to be said for those tried and true, the ones that are passed down from generations before.  For in those dishes lies the flavor of hard work and memories, the flavor of deeply rooted family traditions.  It is the flavor of a weekend spent at Lake Higgins.

Hot Dog Relish, a recipe by Norma Gibbs

Ingredients

  • 3 cups ground (well chopped) cucumbers
  • 3 cups ground onions
  • 3 cups chopped celery
  • 2 Hungarian hot peppers
  • 2 ground sweet red or yellow peppers
  • 3/4 cup salt
  • 1 1/2 quarts water
  • 1 quart white vinegar
  • 3 cups sugar
  • 2 tsp. mustard seed
  • 2 Tbsp. celery seed

Add salt to water, combine and add to vegetables.  Let sit overnight.  Drain and rinse lightly.

Heat white vinegar, sugar, mustard seed and celery seed to boil. Add vegetables and cook slowly, 10 minutes. Seal in hot jars.

A special thank you to The Gillespie Family for an always wonderful visit to Michigan and the lake.  Also, to Foxy for the inspiration and wonderful family recipe.

Garden Greens with Grilled Peaches and Figs

The other day on my way to the dog park, I saw a sign for an estate sale in bright orange paint on a bright yellow poster.  Now, seeing as every four houses on a saturday in Portland is either having a garage sale or an estate sale, I normally wouldn’t detour too far out of my way for one unless I was truly on the hunt.  But this sign, for some reason, called to me.  I turned a sharp right on the next street, found a parking spot and went inside.  Among piles and piles of needless stuff,  I almost immediately spotted and couldn’t take my eyes off of a cast iron grill pan that was sitting quietly in the corner of the kitchen.  I couldn’t leave without it, and I knew I had to have it.  Instantly we were bonded.  It may sound silly, but it almost felt to me as if it had spent its entire existence at this house so that it would be sold, for eight dollars, to me.

Serendipity.  It’s not just a horribly cheesy movie.  It’s also pretty much how I try to live my life.  Opportunities present themselves, sometimes in the form of a job or experience opportunity, sometimes in new and old friends and acquaintances, and sometimes in bright yellow signs with orange paint.  I make an effort to leave space and time in my life for spontaneity, and for the most part I am rewarded.  I’ve also learned to let the things go which do not bring positivity into my life without necessarily being prepared to replace it.  Usually, in this case I am rewarded too.

It’s not easy moving to a new place without having any sort of concrete plans or a solid friend base.  I have my boyfriend, who’s not only a boyfriend but a true friend above all else.  We have an amazing puppy.  We both have at least one job that fulfills us, that makes us happy and has rewarded us in some way.  We are meeting some great people.  We’ve already encountered bumps in the road, impediments that force us to make difficult decisions and sometimes ones with unforeseeable outcomes.  But in making time for the good stuff, and in weeding out the bad, we are making it happen.  Slowly, things are coming together.

I received some great news today, and consequently spent the morning tearfully overjoyed and hugging my puppy.  Yes, good things are brewing on the home front.  Sorry to leave you in suspense, but it’s too early to divulge…and no, I’m not pregnant.  Just wanted to clear that one up.

So instead, I’ll just leave you with this recipe for garden greens with grilled peaches and figs.  There’s really nothing serendipitous about it, except for the fact that I used my amazing new-ish cast iron grill pan and it met- nay surpassed- my expectations.

Garden Greens with Grilled Peaches and Figs

Ingredients:

  • Juicy peaches
  • figs
  • An assortment of garden greens.  Mostly arugula and spinach.
  • Mint
  • Pistachios
  • Some kind of crumbly cheese.  I used homemade farmer’s cheese from my Portland Culinary Workshop class)
  • Olive oil
  • Salt and pepper
  • Juice of half a lemon

Start by gathering your greens.  Farmer’s Market, Trader Joe’s, New Seasons, your neighbor’s garden.  Don’t matta.  Just pick up a bunch and make sure they’re organic and healthy looking.  None of that supermarket iceburg crap.

For this salad, I mooched some spicy arugula, refreshing spinach, and cooling mint leaves from my neighbor’s backyard.  Rinsed, chopped, thrown into a bowl.

Chop the peaches into slices, half the figs and place on a sizzling hot griddle pan with maybe a drizzle of olive oil.  Allow to grill for a few minutes on each side, using tongs to flip, until the fruit is softened and has some grill marks on both sides.

Meanwhile, shell some pistachios.  Use a knife to smush and crack them into smaller pieces (as you would a garlic clove to remove the peel) and throw them in a small pan on low to medium heat for a few minutes to bring out a roasted nutty flavor. Watch carefully so as not to burn, as nuts can and will burn quickly if you don’t keep an eye on them.    Remove from heat, allow to cool.

When your fruit is sufficiently grilled, turn off the heat and remove from the grillpan (or grill).  Allow to cool then cut into chunks.

Assemble the salad.  Throw the greens into a bowl, sprinkle the pistachio, grilled fruit, and some goat cheese, farmer’s cheese, or feta.  Or maybe even blue cheese if you have that on hand instead.  Drizzle generously with a mix of olive oil, salt, pepper, and the juice of half a lemon.  Take a moment to appreciate the simple beauty of the dish.

And then devour.

Lentil Cakes with Cucumber Dill Raita

There are a few reasons why I chose to make this recipe.

1.  Frankly, I’m sick of making popsicles.

2.  I had a whole bunch of plain yogurt in my fridge that needed to get used up.  I bought the dill specifically for this reason: I have been wanting to make raita/something to dip my baby carrots in on a hot day for a while now, so with some leftover raita this recipe is a two-fer.  Two birds, one stone.

3.  I also had this huge bag of lentils from when we first moved in that we haven’t used and was starting to feel guilty about it, oddly enough.  Is there such a thing as chef’s guilt?  For not using what you’ve got before it starts to go bad (like the chard and beets sitting in my veggie drawer as I type)?  Even with non-perishables?  Because if so, I have it.

4. For the first time in almost two months of living in my new spot, it was the first night that I had the entire place to myself.  The boyfriend, roommate and puppy went camping for Ryan’s birthday, and since I had a Plate & Pitchfork event the next day, I couldn’t go.  I enjoy cooking no matter who’s home, but the fact that I had the place to myself that night meant that I could go on a cooking spree uninhibited and uninterrupted.  What’s further, I could cook whatever I wanted because I would be the only one eating it.  I’d be surprised to find myself in the majority opinion of the household when it comes to lentils normally, but this night was different.

5.  Look at the size of these spinach leaves from our neighbor’s veggie garden! How could I not include these in the recipe?!  They are so awesome.

Lentil Cakes with Cucumber Dill Raita 

Yields: 8-10 small to medium sized lentil cakes

Ingredients

Raita:

  • 1-2 cups of yogurt, must be PLAIN
  • 2 Tbsp. Vegannaise, or plain mayo (I prefer the taste of Vegannaise and it’s much healthier)
  • Half a cucumber, skin-on and thinly sliced and julienned (with a mandolin if you have one.  If not, try to mince the cucumber as thinly as possible)
  • 4 cloves of garlic, minced
  • 1/4 cup of fresh dill, chopped
  • a handful of capers, chopped
  • juice from 1/2 a lemon
  • Optional: a few splashes of hot sauce of your choosing (I added Secret Aardvark Habanero hot sauce and it worked perfectly to add a hint of residual spiciness)
  • Salt and pepper to taste

Lentil Cakes:

  • 1 cup organic lentils
  • 1 cup brown rice
  • Half an onion, thinly sliced
  • 1 cup fresh spinach, chopped
  • 2 eggs
  • 1 tbsp curry powder
  • a nice sprinkle of chili flakes
  • 1 cap-full of apple cider vinegar, for lentils
  • olive oil for sauteing
  • salt and pepper to taste
  • Oil for cooking, preferably a higher smoking point oil.  I used a few tablespoons of pork lard that I rendered in a slow-cooker a while back and have kept stored in the freezer.  It works amazingly well for cooking pancakes, grilled cheeses, and in baking for pie crusts, etc.  It makes it much easier to avoid burning what you’re cooking, and as an added bonus you add a very slight bacon-y flavor to whatever you’re cooking.  I don’t expect you to have lard on hand, however I do recommend looking into it for future recipes)
  • optional: a handful of golden raisins or dried apricots, chopped.  (I actually used about a tablespoon of homemade apricot preserves I had made a few weeks ago that worked very well in this recipe)

Start by soaking the lentils on very low heat in salted water for an hour or two.  During this time you can prepare the Raita.  Combine all ingredients in a large bowl, stir well to combine and throw back in the refrigerator.  Drain the lentils, add fresh (salt added) water and cook according to package directions.  At the same time, cook rice according to package directions on a separate burner.  When the lentils are firm and starting to “pop”, remove from heat, add a splash of apple cider vinegar and stir to incorporate fully (don’t add too much, just maybe a cap-full, because any more than that is overpowering).  Allow the lentils and rice to cool down while you saute the sliced onion in olive oil, and when translucent add the chopped fresh spinach, curry powder, salt and pepper and stir until well incorporated and nicely wilted.  

In a large bowl, combine the lentils, brown rice, onion/spinach mix (and raisins, dried apricots, or apricot preserves if you’d like).  Add the eggs as well (it would have been smarter of me to combine the eggs in a small bowl and whip before adding them to the mix beforehand) and stir to incorporate fully.

In a saute pan, heat the oil or lard until sizzling hot (my trick is to soak my hand with water from the sink and “throw” the residual water into the pan to see if it sizzles.  If not, be patient for a few minutes then try again, and if so then it’s ready to go).  Add the lentil “batter” to the pan, forming small palm-sized circular patties.  It’s important to keep in mind that they are fragile and prone to break or split easily.  Do not to mess with them too early or else they will break, but also keep a patient yet diligent eye on them so as to prevent burning.  This can be tricky, but I suggest letting them sit on each side for 4-5 minutes and then flipping them very carefully in between.  As with pancakes, once each batch is finished, place them carefully on a plate and keep them in a warmed oven until completely finished.

Place 2 to 3 on a each plate, and top with the chilled Raita.  Serve with a lemon wedge and maybe some extra fresh dill if you have left over, which you should.

What I love about this recipe is that there’s so much room for playfulness here.  You can add almost anything you’d like to the cakes, whether it’s broccoli, kale, cilantro, zucchini, chopped apples, flax seeds, nutritional yeast, etc.  Its a great canvas for exploration, and I suggest, if you are interested in making a similar recipe, that you do add your own twist to it.  I’d love to hear your ideas or suggestions.

Cheesy Vegan Kale Chips

This isn’t the first time I’ve done a blog post devoted to kale chips, but they’re just so gosh darn delicious (and addicting, I might add) that they deserve to be brought back to the forefront of my blog for this evening.

HA! Tricked you.  You totally thought this was my veggie garden, didn’t you?

I WISH.

Actually, my rad new neighbor(s) stopped by for a chat this morning and mentioned that their backyard veggie garden is in serious summer surplus mode and demand is at a premium.  It’s. A. Rough. Life. For. Us.

As a self-diagnosed veggie hoarder (note the pic of the current state of my fruit/veg drawer in the fridge), I pretty much teleported myself to their backyard as soon as I possibly could to get my hands on some.

Among the wide variety of awesomeness I found, I came home with some basil, rosemary, a few leaves of rainbow chard, and kale.  I have some manners.  Some.

Having just picked up a new bunch of purple kale at the farmer’s market yesterday, I knew that throwing the leaves in the fridge would likely result in a mess of yucky smelly goo on the bottom of the veggie bin. It’s never a good thing to let fresh food go to waste, let alone a very nasty waste.   And anyone who’s ever suddenly found themselves with a surplus of kale can likely attest to this phenomenon.  If not, then you my friend are a jedi of kale.   But for us less gifted, there is one solution to this problem and it is a good one at that: kale chips.  Make a batch and, I swear, you’ll be down to a workable amount of fresh kale before you know it.  These babies are so addicting (and guilt-free), they’ll be gone before you leave the kitchen.  Literally.  As in, I put them in a bowl to share with everyone else and just stood in front of the bowl shoving them in my mouth for like five minutes until they were gone.

Cheesy Vegan Kale Chips 

Ingredients:

  • One bunch of organic kale, de-stemmed and chopped into large pieces
  • One healthy dose of olive oil, maybe two to three tablespoons, poured in small increments
  • Salt and Pepper
  • Chili Flakes
  • Two or three large pinches of nutritional yeast (“healthier” alternative to cheese, many vegans use it as a substitute to that cheesy flavor.  For instance, my old roommate Susan used to make vegan mac ‘n cheese with nutritional yeast.  It doesn’t compare to cheese in texture by any means, but I actually really enjoy using it  on popcorn, scrambled eggs, kale chips, etc.)

Preheat oven to 250 (any higher and your kale chips will burn).  In a bowl, toss kale with the rest of ingredients and ensure an even coating.  Spread out evenly on a baking sheet or large piece of aluminum foil.

Place in oven and bake for about an hour, or until the chips are completely dehydrated and crispy.  Remove from oven, and enjoy.

Lesson learned today: Dino kale is the best type of kale to use for chips due to its rigidity.  It’s the kind with the long and thinner crinkled dark green leaves pictured above.  A close second is the green kale- the firm, almost sharp looking leaves that you can usually find in the market or grocery store.  Try to avoid using Russian or Purple kale.  Also, don’t over oil the greens.  Use only enough to very thinly coat each leaf, as the oilyness comes out when crispy and the idea is to avoid greasiness.

Ingredient of the Week: Sunchokes

Sunchokes, also known as Jerusalem Artichokes, first really came onto my radar a few weeks back at The Cheese Shop’s Farm to Table Dinner, where they served a smashed sunchoke and potato side dish.  I had heard of the ingredient a few times here and there, maybe on Food Network, in a blog or at a farmer’s market, but was always so confused by it that there was no getting me near that thing.  Was it a root, similar to a potato that you can boil or bake?  Do you have to cook it or can you eat it raw?  Or is it more of a spicing agent with its similarity in appearance to ginger or fresh turmeric?  Does it have to be peeled or can you eat the skin?  These were all questions that floated into my mind as I was confronted with the ingredient, so overwhelmed by it all that I didn’t dare consider bringing some into my kitchen.

Now that I think about it, I’ve often felt this way about less common ingredients I find at the market.  Similar to celery root (celeriac) or fava beans, my curiousity about ingredients such as sunchokes was overshadowed by my fear of the unknown.  I admit, I’ve been known to judge a book by it’s cover once or twice in my time.  I remember the day a bulb of fennel once growled viciously at me from the shelf of the grocery store, offering a challenge that my insecurities told me was out of my league.  Yet my instinct spoke otherwise: since incorporating it into my cooking I have learned to embrace its licorice-like flavor and crunchy texture, enhanced only by the discovery of its ease and incredible versatility.  It was then that I realized, isn’t the experience of learning new and exciting things perhaps what I love most about cooking?  With this newfound enthusiasm at the forefront of my mind, I grabbed a few sunchokes out of the basket at the Aspen Emporium and Flying Circus and set out to conquer at least one of my fears.

With a little examination and research, I discovered that the sunchoke’s bark really is a lot bigger than its bite.  From reading about the sunchoke, I learned that they are of the tuber family, which also includes potatoes, sweet potatoes, yams, ginger, jicama, parsnip, radish, and rutabaga.  Contrary to popular belief, they are not in fact related in any way to the typical artichokes we find in markets.  They are actually, and quite surprisingly, a part of the sunflower plant that grows below the ground.  Nutritionally speaking, sunchokes contain a significant amount of inulin, a carbohydrate linked with a healthy digestive system due to its probiotic (bacteria forming) properties.  They are also high in fiber, B vitamin folate, vitamin C and iron.  Most of these nutrients, however, are found in the skin of the sunchoke, so I recommend cleaning it well and cooking it skin on.

Appearance-wise, sunchokes have a beige or even brown skin and are nobby and similar in size to ginger.  In fact, it would not be unheard of to confuse a sunchoke with a piece of ginger in a market, so be mindful of that when shopping.  In terms of taste, they are nutty, often sweet, and do share some similarities with the flavor of an artichoke (perhaps that is how they got the name?).  They can be treated in the same way as a potato, boiling it to soften and then mash it, baking to a soft on the inside, crispy on the outside consistency, or pan sauteing with other veggies in a stir-fry.  Contrary to the potato, it can be eaten raw, as many recipes call for throwing some thinly shaved sunchoke into a leafy green salad for a fresher take on the tuber.

Simple Roasted Sunchoke

To be honest with you, the original title of this recipe was Roasted Sunchoke Chips but the thin pieces of sunchoke came out soft rather than crunchy and crispy, so I had to change it a bit.  This one is so simple I would hardly count it as a recipe.  Preheat your oven to 300 degrees.  After washing your sunchokes well, chop them into small pieces.  Coat evenly in olive oil, sea salt and pepper and, if you would like, some chopped rosemary.  I have found that the flavors of sunchoke and rosemary work well together.

Spread the pieces evenly on a baking sheet and throw in the oven for fourty five to an hour, until the pieces are nicely browned on the outside and soft with a bite on the inside.  Remove from heat and allow to cool for five minutes before serving.  This works best as a side dish, with maybe some roast chicken or a nice fillet of fish and alongside some fresh veggies.

Ingredient of the Week: Fresh Turmeric

In an attempt to expand my mental pantry, I’m going to be selecting an ingredient each week to highlight right here on this blog.  These explorations will likely feature something I’ve never or hardly ever used in my cooking that I may come across at the market or read about on a food blog or book.

To start this project I’d like to introduce you all to fresh turmeric.  I found this root ingredient at the Aspen Emporium and Flying Circus the other day while I was picking up some produce.  At first glance I thought it was ginger root because of the similarity in skin and appearance.  Upon closer look though, I was able to distinguished turmeric by its deep orange color underneath the skin as well as it’s smaller size and less nobby shape in comparison to ginger.   I’ve seen ground turmeric among spice selections at most markets, and in fact have some in the spice cupboard here at home, but fresh turmeric root is something new and entirely different from it’s dried and ground counterpart.  You can find ground turmeric in the spice aisle of most supermarkets, but fresh turmeric can be more difficult to find.  Believe me, it’s worth the hunt.

If you know the difference in flavor between ground ginger and fresh ginger or garlic powder and fresh garlic, then you can understand why fresh turmeric was an exciting find for me.  The freshly grated adds a mild, earthy and almost refreshing flavor to dishes that the dried version absolutely lacks, without being overpowering.  I was warned before purchasing that it is commonly used as a coloring agent in cooking, acting as a naturally yellow dye to many of the products we see in the grocery store today: mustards, curry powders, etc.  After having cooked with it rather carelessly, I now know what they were talking about: the dye is so powerful that it actually stains your skin yellow when you handle it.  For both color and flavor it is an essential component in curries and thus a staple ingredient many Indian, Moroccan and Middle Eastern dishes.

Parsnips, brussel sprouts and red jalapeno with fresh turmeric (check out that color!) served over brown rice with a farm greens salad (these greens were brought home from CRMPI)

Aside from color and flavor, (fresh) turmeric contains the active ingredient curcumin which boasts some incredible health benefits.  Research suggests that in addition to it’s  high antioxidant content, it is also purported to aid in anti-inflammation, lower both blood sugar and cholesterol levels, and may even prevent certain types of cancers.  Other benefits of turmeric (curcumin) include stomach-soothing, antibacterial and liver detoxifying properties.  For these reasons, curcumin can now be found in many health food and alternative medicine stores in powder and pill forms for supplemental use.

Below are two simple recipes featuring fresh turmeric:

Turmeric Kale Chips

Ingredients:

  • 3 or 4 leaves of kale, rinsed, stems removed and roughly chopped (I brought these home from CRMPI)
  • drizzle of olive oil
  • generous grating of fresh turmeric
  • kosher salt and pepper to taste
  • dried chili flakes (optional)

Preheat oven to 425.  In a large bowl, combine all ingredients and mix well to incorporate the oil and spices evenly onto the kale pieces.  

Spread kale on baking sheet and spread out so that the leaves are overlapping as little as possible.  

Bake for 45 to an hour, until the leaves are dried and crispy without any sogginess.  They should not be brown or burnt but rather take on a darker green hue.  Remove from oven, allow to cool for five minutes, and enjoy.

Deviled Farm Eggs with Fresh Turmeric 

I was reminded of my love for deviled eggs at The Cheese Shop’s Farm-to-Table Dinner (they used duck eggs) a few weeks ago, and going by the fairly traditional recipe of curried deviled eggs I was inspired to create my own version using freshly grated turmeric.

Ingredients

  • However many farm eggs you’d like (For a snack portion, I used two of the farm eggs I took home from CRMPI)
  • Mayonnaise, aioli, or anything similar (Vegannaise is also a great healthier option)
  • Dijon mustard
  • Generous grating of fresh turmeric
  • half a scallion, minced (can also use garlic, onion or shallot), also a few more slices for a nice garnish
  • dash of dried chili flakes to taste (you can also use a hot sauce like Tabasco or Cholula if you like the heat)
  • kosher salt and pepper to taste
  • paprika, for garnish

First you must hard boil the eggs.  To do this place the eggs in a saucepan and fill with water so as to immerse the eggs entirely in the water.  Bring the water to a boil on high heat, simmer at a boil for a minute and then turn the heat down low and let simmer for fifteen or so minutes.  My eggs actually took over a half hour simmering, because I live at 8500 feet and they still were just barely cooked through at the fifteen minute mark.  I personally would recommend allowing the eggs to simmer for longer than instructed, but the only way to know is to sacrifice an egg, peel it open and if it’s ready, great; if not, keep them simmering and, alas, savor that soft-boiled deliciousness.  Once the eggs have been cooking for as long as your patience can handle, drain the hot water and re-fill the saucepan with cold water (a few ice cubes speed up the cooling proces) and allow to sit for about 10 minutes as this will ease the already difficult task of peeling the eggs.

Once peeled, slice eggs in half and separate the yolks from the whites.  In a bowl, combine yolks with mayo, mustard, fresh turmeric, scallion, chili flakes, salt and pepper, using a fork to mix and incorporate all ingredients.  The mixture should become silky and soft, rather than chunky, after a few minutes of mixing.  Spoon or pipe the mix back into the whites and top with some sliced scallions and a sprinkle of paprika.

I encourage you all to get out there and give fresh turmeric a try for yourself.  Besides these recipes, I would suggest adding freshly grated turmeric to simply sauteed veggies, or incorporating it into traditional recipes for those extra little kicks of flavor, color, and sheer nutritional value.

Bacon Wrapped Asparagus with a Duck’s Egg

Ever since I have discovered a few markets where I can easily find organic produce and quality meat, dairy and grain products (namely, Vitamin Cottage in Glenwood Springs and The Aspen Emporium & Flying Circus) in and around the relatively isolated Aspen/Snowmass area, I have had this new obsession with creating simple recipes with quality ingredients and only a few easy steps.  The great thing about cooking simply, or cooking in general for that matter, is that ingredients used in the recipes can be substituted to suit your tastes.  Despite the simplicity, I still want to post my recipes in hopes that you might find some inspiration to create your own.  Please feel free to use my posts as models, rather than recipes, in order to cook a dish that suites your taste.

Bacon Wrapped Asparagus with a Duck’s Egg

wrap a small bundle of organic (smaller and thinner than non-organic) asparagus in two to three pieces of bacon (I used all-natural uncured which gave it an amazing flavor)

I will use my sister Kyle as an example.  With this recipeI know how much she despises asparagus so if I were to cook it for her I would substitute, say, brussel sprouts or something of the like.

pan saute the bacon-wrapped bundle on medium heat until it is cooked thoroughly by rotating ninety degrees every minute or so (the thin asparagus needs hardly any cooking at all to achieve a soft yet crispy texture, so focus here on the doneness of the bacon, which should be crispy and caramelized all around rather than chewy)

Brussel sprouts, however, don’t have a shape that is conducive to wrapping whole slices of bacon around it.  Therefore, I suggest chopping the bacon into small pieces and pan saute it with the brussel sprout halves so that they cook in the yummy bacon grease to get that great flavor and caramelized color.

on a non-stick pre-heated pan, fry a duck's egg over easy by cooking it sunny side up until most of the white is cooked, then flip over for a quick sear on the other side and remove from heat. Serve on top of the asparagus with a runny yolk, and alongside a small salad or any other side of your choosing.

Once the brussel sprout/bacon mixture is done, remove from the pan and cook the duck’s egg in the same pan (that is still hopefully coated in bacon grease) for two reasons: the grease helps to ensure the egg does not stick to the pan, and also to get that great bacon flavor into the egg.

As a substitute for bacon, you could use prosciutto or turkey bacon.  For the duck’s egg, any type of egg is fine but it’s best to use free-range organic eggs as always.

A Bubba Kind of Recipe

If you are curious to know why I’ve been a bit slackin’ on my bloggage, I’ll give you a hint:

Yep, you guessed it.  The bubbas (minus the mommy bubba) were in town for my birthday weekend and I simply didn’t have the time!

Kyle modeling the latest cross country ski garb

When we weren’t hitting the slopes, we could be found hot tubbin’, XC skiing in the backcountry near Ashcroft, gettin our grub on at Pine Creek CookhouseMatsuhisa or Zanes, and most importantly chilling out with a glass of wine in our hands while cooking some din din.

not a bad view

Matsuhisa Sushi

The dinner at Matsuhisa was no doubt one of the most memorable meals any of us have ever had, but there really is no comparison to a home cooked meal with friends and family, sharing a few bottles of wine or some beer and just hanging out.  On their second night in town we opted to stay in and cook a meal together rather than go out to one of the many fantastic restaurants in Aspen.

Now my dad, the grillmaster and “all-knowing chef de cuisine” in our family, is one of the few people in my life who’ve had a significant impact on my passion for cooking, so naturally it was he who spearheaded the dinner.  He prepared a roast pork loin.


Did you know that my sister Kyle is an awesome cook too?  Because she is.  Now she might not keep a blog to blabber on about every little thing she cooks, but there is one thing that’s for sure: girl can get down with some roasted eggplant.  As a side dish, she sliced the eggplant in circular half inch slices, coated them in olive oil, salt and pepper and then pan roasted them until soft.  Normally I don’t think to cook with eggplant, but after having eaten it this way I made the decision to incorporate it into more of my cooking in the future.  She also sauteed some onions that we combined with braised fennel.

The last key element to our meal was the roasted potatoes, a Kemp family tradition for as far back as I can remember.  The recipe that we loosely followed was a recipe that has been given to me by my Aunt Jane, another culinary mentor of mine.  This is a simple recipe that is absolutely delicious and a great side dish to any meal, and the recipe can be found at the bottom of this post**.

Gunner brought the tug-o-war rope for his side dish

and Tim poured the wine very graciously,

which Kyle, Dad and I gladly enjoyed and agree that it was equally important a role as the chefs….

All things considered, it was a delicious meal and an even better family visit.  Love me some bubbas.

**Roasted Red Potatoes

Ingredients:

  • Red skin or Yukon Gold potatoes (small size)
  • Olive oil
  • Salt and Pepper
  • Garlic Cloves
  • Chopped fresh herbs (I prefer Rosemary)

Rinse and dry potatoes.  Boil potatoes in hot water for a few minutes to soften, then drain.  In a heavy roasting pan, add potatoes and drizzle with olive oil, salt and pepper.  Bake at 400 degrees, stirring every 30 minutes or so.  After 45 to an hour, turn oven to 350 degrees and add garlic cloves (shelled or unshelled, up to you) into the pan.  Drizzle again with olive oil, bake for another half hour or so.  Add herbs towards the end of baking.

Roasted Root

Last night my very thoughtful aunt Cheryl called to let me know of a great article she found in the New York Times on root vegetables.   

Now I’ve always loved me some good ol’ carrots and potatoes, but the other roots have never quite made the grocery list cut.  I admit, this is partly because of my unfamiliarity with these raw ingredients, but also because up until now I never really knew how to cook them.  Baked celeriac?  Parsnip gratin? Really?

Reading this article, I felt as if a whole new world of cooking had just opened up for me.  The idea of root vegetables being used interchangeably: now this is the start of something awesome.  In other words, all of your recipes starring the ever so versatile (yet relatively bland on its own) potato can in fact be substituted for a more sophisticated twist, say turnips, parsnips, or celery root if prepared correctly.  Yet before I start getting crazy with roots, it’s important for me to understand the basic texture and tastes of each individual root. 

Roasted Root

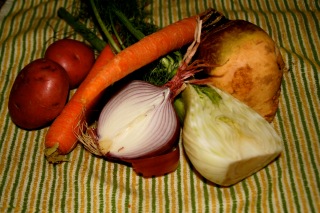
Ingredients:

  • Carrot
  • Red potato
  • Turnip
  • Fennel bulb
  • Red onion
  • Olive oil
  • Sea salt and fresh cracked pepper
  • Rosemary

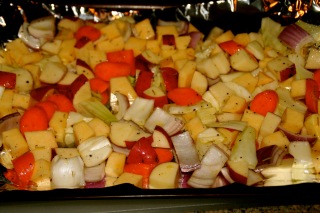
Preheat oven to 400 degrees.  Remove tunip skin and wash all the veggies.  Chop into like-sized pieces in order to bake evenly and place in bowl.  Drizzle generous amount of olive oil, salt and pepper, and rosemary over and stir to coat evenly.  


Transfer to aluminum lined baking sheet and bake for over an hour, until the veggies begin to carmelize and potato and turnip are tender.   

In addition to the roots, I also went with onion and fennel.  The onion is a great aromatic with a crunchy texture and definitely mellows out when cooked.  The fennel I went with because I’m still on a fennel kick from my last recipe and am constantly wanting to cook with it these days.  I bet whole garlic cloves would be great to add to this combo as well but I didn’t think of it at the time.  I was actually really hoping that they’d have beets at my market today but they were out.  Beets are not only one of my favorite roasting veggies, but you can chop off the beet greens and saute them for a great side, add them to a soup (see my Winter Veg Chicken soup below, sub chard for beet greens) or do with them whatever you fancy.   I can assure you that you will be seeing beets in many of my future dishes.  

A big THANKS to my Aunt Cheryl for an great recommendation.